First steps with the BillPro API
Use the BillPro API to automate your billing operations for card payments.
With the BillPro API, you can create customers and orders for the products and services you sell. You can then render a custom checkout or use BillPro's payment links to accept customer payments. You can also manage orders and scheduled payments.
The following diagram shows typical API workflows.
flowchart TB

  CreateCustomer["Create Customer"]
  GetCustomer["Get Customer"]
	CustomerID["Customer ID"]
  GetProduct["Get Product"]
	ProductID["Product ID"]
  CreateOrder["Create Order"]
  GetOrder["Get Order"]
  OrderID["Order ID"]
  GetScheduledPayments["Get Scheduled
  Payments"]
  ManageOrder["Manage Order"]
  ScheduledPaymentID["Scheduled Payment ID"]
  ManageScheduledPayment["Manage Scheduled
  Payment"]

  CreateCustomer --> Customer
  GetCustomer --> CustomerID
  GetProduct --> ProductID
  CustomerID --> CreateOrder
  ProductID --> CreateOrder
  GetOrder --> OrderID --> GetScheduledPayments
  OrderID --> ManageOrder
  OrderID --> ManageScheduledPayment
  ScheduledPaymentID --> ManageScheduledPayment
BillPro API URLs
The BillPro App is available in the staging and production environments. For testing, use the staging environment.
| Type | Interface | URL | Notes |
|---|---|---|---|
| Production | UI | https://app.bill.pro. | Live production environment |
| Production | API | https://app.bill.pro/api/v1 | Live production API |
| Staging | UI | https://staging.bill.pro | Test environment |
| Staging | API | https://staging.bill.pro/api/v1 | Test environment API |
For API access, you can obtain the API URL, tokens, and merchant profile IDs by viewing the API user account in the BillPro UI.
BillPro test systemThe URLs in the examples in the API documentation contain the product environment URL with
app. Replace it withstagingfor the staging environment.
BillPro API and integration with StripeThe BillPro payment gateway features are not available with Stripe
- Custom checkout integration (use order portal link integration)
- Webhook (use payments API)
Before you use the BillPro API, complete these steps.
- Familiarise yourself with the BillPro platform, especially order status changes and how to manage cards, payments, and billing events. Create some test orders using the BillPro UI in the staging environment.
- Create your products in the UI in the staging and production environments. You cannot create products with the API, and you will need a product to create an order.
Then, follow this guide to start using the BillPro API. This documentation applies to BillPro API v1. All minor versions retain full backward compatibility with previous minor versions.
How to get an API token
- Log in to BillPro UI as an
admin_user. - Select your merchant profile.
- Go to the user account icon in the top right corner, and open the user account menu, then select Users.
- Create a separate integration user with a Role of
admin_userand select Api Access.- We recommend creating a separate integration user for each merchant profile. This makes your API operations more transparent, traceable, and secure. However, it is possible to select more profiles for a user. If the user can access multiple profiles, you must specify the
profile_idas a query parameter in every API request. This maintains backward compatibility with previous versions where a merchant could not have multiple profiles. - To integrate with payment links, select Payment Link.
- We recommend creating a separate integration user for each merchant profile. This makes your API operations more transparent, traceable, and secure. However, it is possible to select more profiles for a user. If the user can access multiple profiles, you must specify the
- From the User Details screen, obtain the Api Token, which is a long string. The following string is an example only and not similar to a real API token:
abcd12341234123412341234abcd1234123412341234abcd12342342134. Each API token is associated with a user. To deactivate the token, you can edit the user and deselect Api access or make the userinactive. - Get the API base URL from the first part of the Api Order Creation URL in the UI of the environment you are using. For example, for the staging environment this is
https://staging.bill.pro/api/v1/. The production environment ishttps://app.bill.pro/api/v1/. - If you have multiple merchant profiles, obtain the profile
idnumber for each merchant from beside the merchant name in the Merchants list.
Screenshot of user details in the BillPro UI.
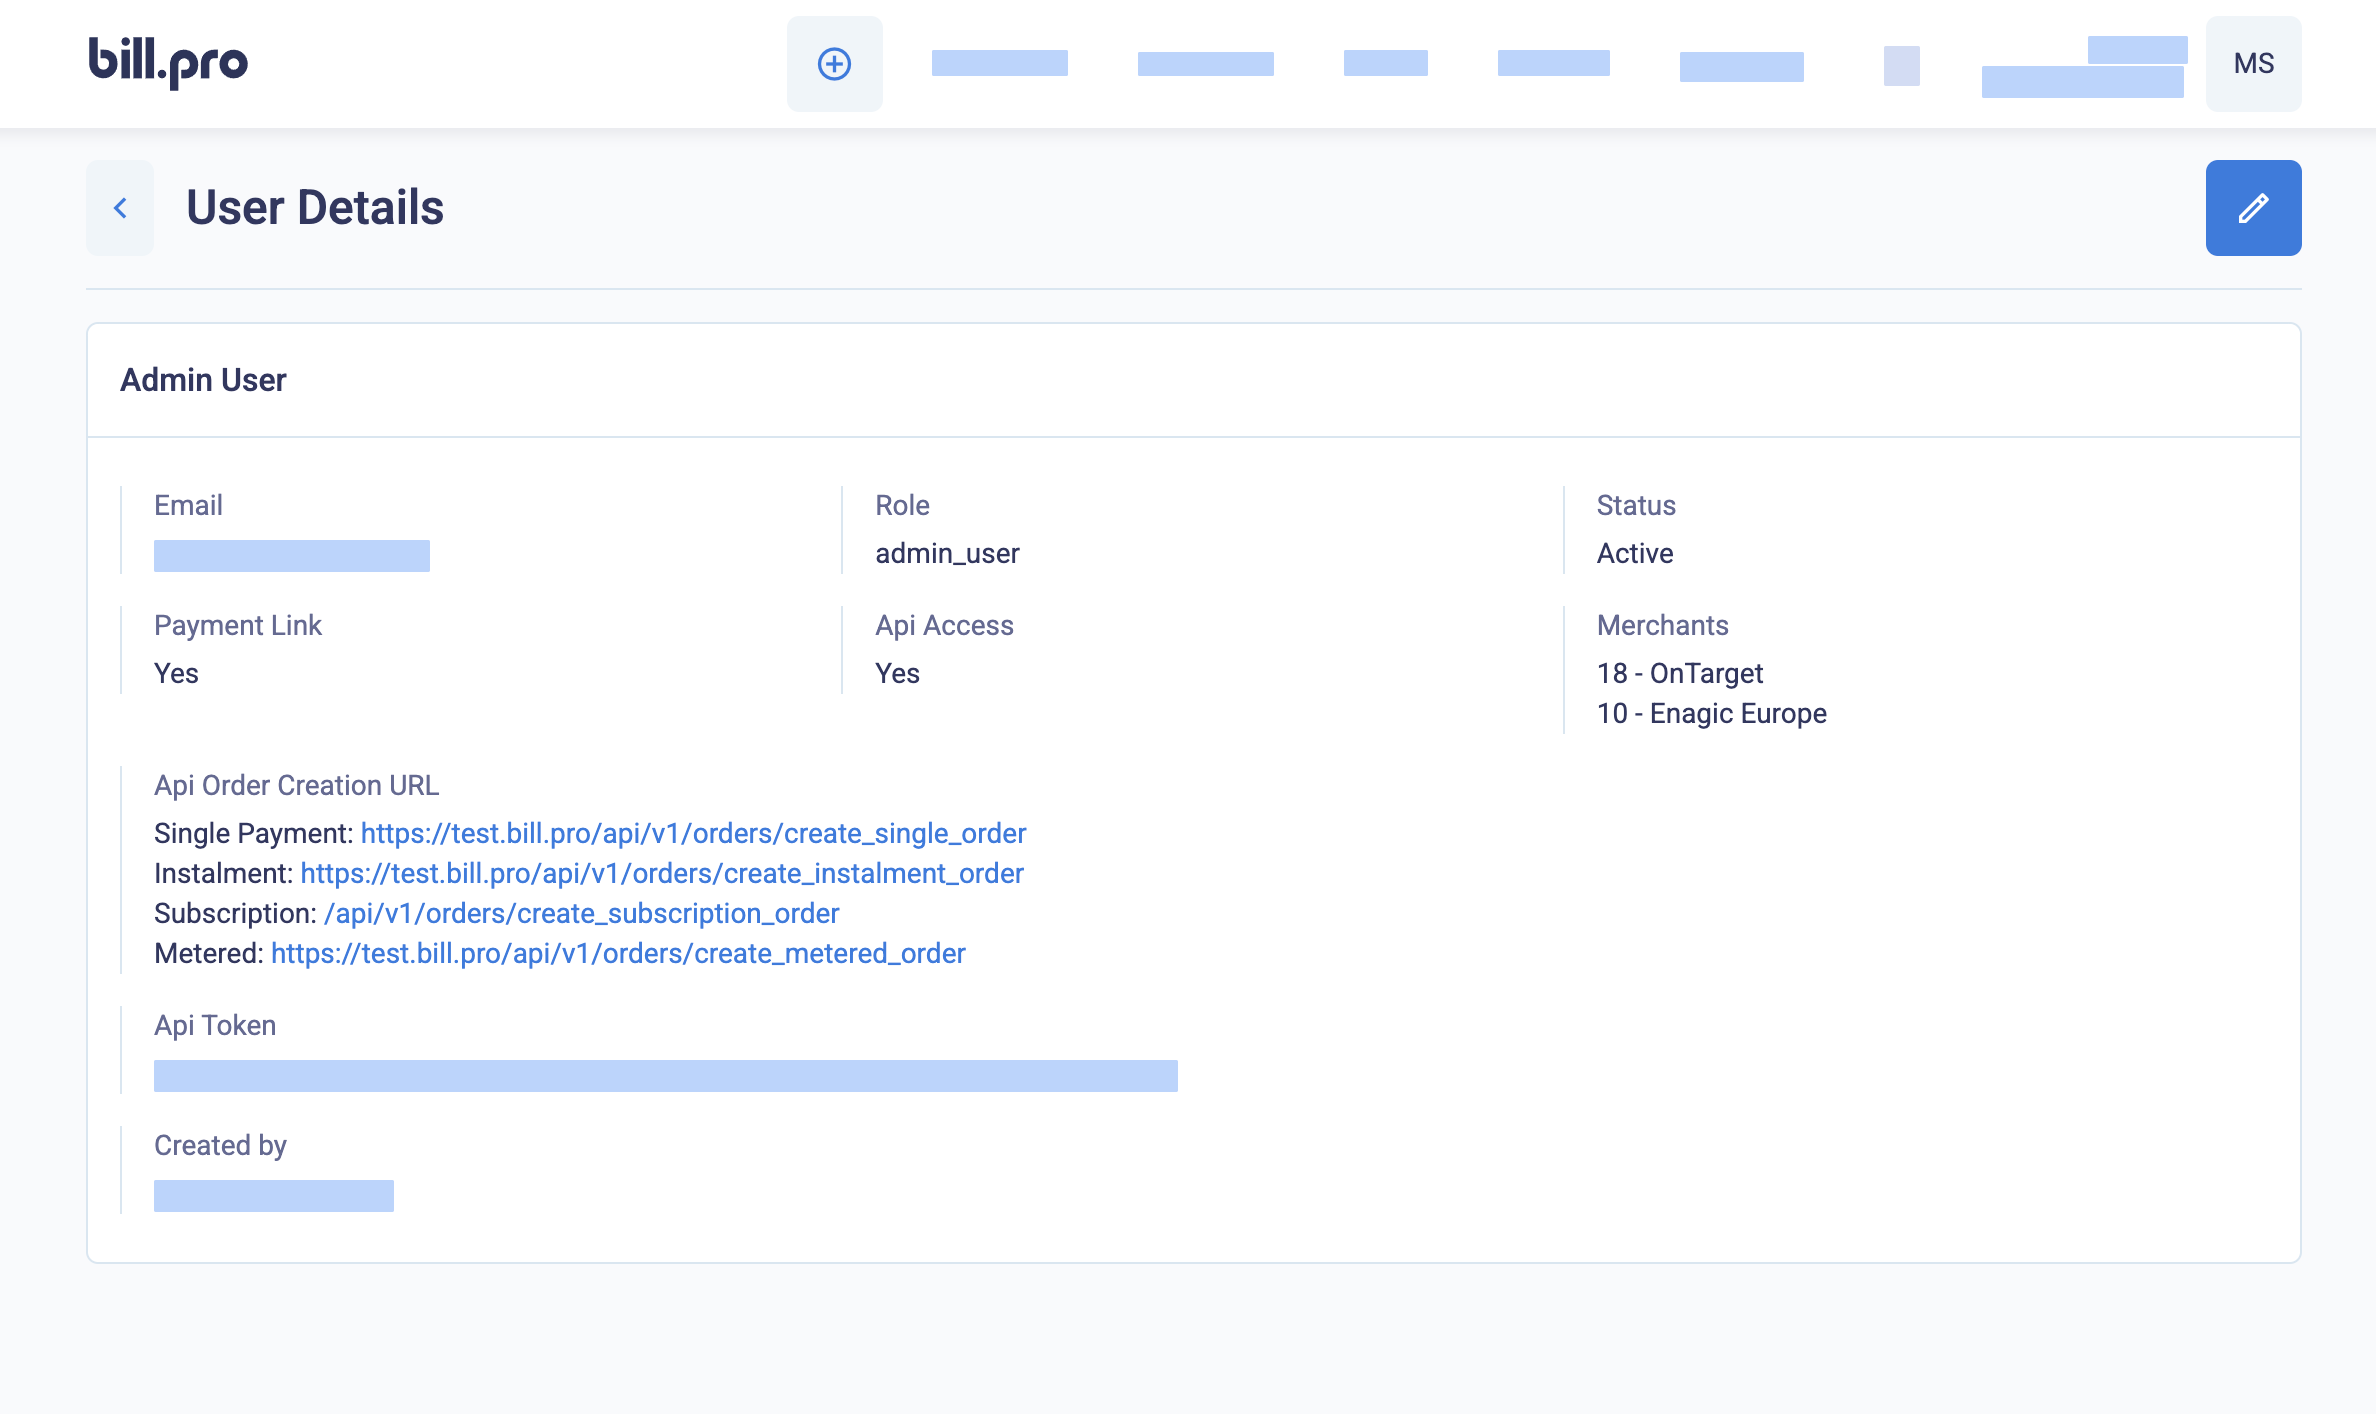
Display the user details, including the merchants list
If you need to get the API token or profile ID again from the Users list, click the eye icon to display the User Details.
How to use the API token
The BillPro API is a REST API. Send your requests over HTTPS. To authorise your requests, add Bearerand your API token to the Authorization header. In the example requests, replace {api_token} with your API token, as shown in the example in the section Your first API call.
--header 'Authorization: Bearer {api_token}' \Your first API call
Make a GET request to the products endpoint to list the first page of products. The default page size is 25 items in a list. There is no pagination metadata. Get the pages sequentially by incrementing the page number. If the page list contains 25 items, try to get the next page, until you get a page with fewer than 25 items.
- Copy the request to your terminal or import it to an API client such as Postman.
- Replace
{api_token}with your API token. - Send the request.
curl --request GET \
     --url 'https://staging.bill.pro/api/v1/products?page=1' \
     --header 'Authorization: Bearer {api_token}' \
     --header 'accept: application/json'
If your API token was abcd12341234123412341234abcd1234123412341234abcd12342342134, you would send the following request.
curl --request GET \
     --url 'https://staging.bill.pro/api/v1/products?page=1' \
     --header 'Authorization: Bearer abcd12341234123412341234abcd1234123412341234abcd12342342134' \
     --header 'accept: application/json'
In the API reference documentation, paste your API key in the Authorization field and click Try it!.
API request with multiple merchant profiles
This example only applies to API users with access to multiple merchant profiles.
We recommend creating a separate API user for each merchant profile. Otherwise, if your API user can access more than one merchant profile, you must send the profile_id parameter as a query parameter with all API requests.
The following request lists products for the merchant with a profile ID of 5.
curl --request GET \
     --url 'https://staging.bill.pro/api/v1/products?page=1&profile_id=5' \
     --header 'Authorization: Bearer abcd12341234123412341234abcd1234123412341234abcd12342342134' \
     --header 'accept: application/json'
This request is similar to the previous request, but it includes the profile_id as a query parameter.
You can get the profile_id for each merchant profile from the API User account details page where you can also get the API token.
Get the API response
The API returns data objects in JSON format with the content type of application/json. The response body of a successful GET request could look like the following example.
[{"id":1,"product_id":"E2824181D8","currency":"GBP","price":"44.99","product_type":"subscription","product_status":"active","lock_price":true,"lock_payment_config":false,"product_group":"Memberships","scheduled_interval":"1","scheduled_unit":"MONTH","fee_for_initial_payment_only":true,"discount_for_initial_payment_only":true,"deposit_amount":"42.74","created_at":"2024-02-12T15:12:37.314Z","discount":{"name":"Discount 5%","percentage":"5.00","description":"Five Percent New Customer Discount","created_at":"2022-05-05T15:23:16.666Z","updated_at":"2022-06-14T10:45:13.933Z"},"tax":{"name":"VAT Spain","percentage":"21.00","description":"Spain Value Added Tax 21%","created_at":"2022-05-05T15:18:09.958Z","updated_at":"2022-05-08T16:06:29.185Z"}}]When testing in the terminal, you can use a JSON formatter to make JSON objects easier to read.
This example uses JQ.
curl --request GET \
     --url 'https://staging.bill.pro/api/v1/products?page=1' \
     --header 'Authorization: Bearer abcd12341234123412341234abcd1234123412341234abcd12342342134' \
     --header 'accept: application/json' | jq .
The formatted data object for the same product shown above would be as follows.
[
  {
    "id": 1,
    "product_id": "E2824181D8",
    "currency": "GBP",
    "price": "44.99",
    "product_type": "subscription",
    "product_status": "active",
    "lock_price": true,
    "lock_payment_config": false,
    "product_group": "Memberships",
    "scheduled_interval": "1",
    "scheduled_unit": "MONTH",
    "fee_for_initial_payment_only": true,
    "discount_for_initial_payment_only": true,
    "deposit_amount": "42.74",
    "created_at": "2024-02-12T15:12:37.314Z",
    "discount": {
      "name": "Discount 5%",
      "percentage": "5.00",
      "description": "Five Percent New Customer Discount",
      "created_at": "2022-05-05T15:23:16.666Z",
      "updated_at": "2022-06-14T10:45:13.933Z"
    },
    "tax": {
      "name": "VAT Spain",
      "percentage": "21.00",
      "description": "Spain Value Added Tax 21%",
      "created_at": "2022-05-05T15:18:09.958Z",
      "updated_at": "2022-05-08T16:06:29.185Z"
    }
  }
]
For information about error responses, see the Get API response codes section.
Create data objects
When create or update an entity with aPUT or POST request, send data as a JSON object or FormData, as you prefer. Specify the data type in the header, e.g. application/json.
The following object is a create customer object. However, the phone number is intentionally invalid for the country code. For full details of each data object, see the API reference documentation.
{
    "customer": {
        "first_name":       "Dana",
        "last_name":        "Borys",
        "date_of_birth":    "12/05/1995",
        "email":            "[email protected]",
        "phone":            "+44770000000000",
        "organisation": {
            "name":                 "TEST1",
            "registration_number":  "081234567",
            "web_url":              "https://staging.bill.pro",
            "vat":                  "GB0123456789",
            "description":          "Mutual society"
        },
        "addresses": {
            "billing_address": {
                "street":       "28 Milsom St",
                "city":         "Bath",
                "state":        "Avon",
                "country":      "GB",
                "postal_code":  "BA1 1DG"
            },
            "shipping_address": {
                "street":       "28 Milsom St",
                "city":         "Bath",
                "state":        "Avon",
                "country":      "GB",
                "postal_code":  "BA1 1DG"
            }
        }
    }
}
When a POST or PUT request succeeds, BillPro returns the new data object in the response body. The response can include additional attributes you can use in future requests.
For example, when you create a customer in BillPro, the response includes the id (the unique system identifier), and the merchant customer_id. It also includes the timestamps for when the customer account, the customer's addresses, and the customer's organisation were created and updated.
Get API response codes
The BillPro API returns standard HTTP status codes for all requests.
The main status codes used are as follows.
| Request | Status | Response |
|---|---|---|
| GET | Successful | 200 OK |
| POST | Successful | 201 Created |
| ANY | Bad | 400 Bad Request |
| POST | Error, e.g invalid data | 422 Unprocessable Content |
Some requests also return a message with the error code. You must check the API error codes and responses for each endpoint at Customers, Products, Orders, and Scheduled Payments.
When creating an order, with invalid data, the error message is { "error": "Bad Request" }.
But if you send a POST request to create a customer and the customer data object has an invalid attribute, such as the phone number is not valid for the country code, the response body contains an error message. The message displays the field with the error and the issue, in this case it is {"phone":["is invalid"]}.
Try requests with the API documentation
Use the interactive requests in the API reference documentation to test requests to the BillPro API. Paste your API token in the Authorization field, enter or select the required values, and click Try it!.
Each merchant has its own customers, products, and orders. Entity identifiers are unique across the whole platform, not just per merchant, so you need to get values for your merchants. Your API token does not give access to entities of other merchants.
First, use GET requests to list entities in your merchant. Then try specific GET requests using a valid entity id.
To test creating an order, create a product in the UI. Then use the id of the product as the product_id and the id of the customer as the customer_id, in the order request body.
Please read the separate documentation to Integrate with payment links or Integrate with custom checkout and payment iframe (for CardCorp merchants only), as well as to integrate with the BillPro payment gateway webhook.