Create an instalment order
Create an order with multiple payments
For an instalment order, you charge the product's price with an initial payment and multiple billing events.
Before you begin:
- Create at least one single payment or instalment product. See Create a single payment product or Create an instalment product
- Create a customer or have the customer details ready to create the customer directly in the order. See Create customers.
To create an instalment order, follow these steps.
-
Access the New Order pop-up using one of the following methods:
- On the navigation bar, select Orders. In the top right corner of the Orders list, click (+).
- On the navigation bar, click (+), and select Add Order.
- In a customer account, from the gear options menu, select Create Order.
-
Select the Customer, or to add a new customer, click (+), and enter the customer details.

Select or create a customer, enter an Order ID, and select a currency
-
(Optional) For the Order ID, enter your identifier for the order, or BillPro will create one for you.
-
For the Currency, select one of the acceptance currencies of your merchant.
-
For the Product, select an instalment product.

Select an instalment product and enter pricing
-
For the Qty, enter the units the customer will buy.
-
If product pricing is not locked, you can do these steps.
- For the Amount, enter the full purchase price of the product, including taxes.
- To enter a discount, fee, or tax, click Show options.
- (Optional) Select a Discount or select
CUSTOMand enter a discount amount. - (Optional) Select a Fee or select
CUSTOMand enter a fee amount - (Optional) Select a Tax to display as included in the product's price. BillPro calculates the tax amount.
- (Optional) Select a Discount or select
-
If the product payment configuration is not locked, you can do these steps.
-
To allow the customer pay in a single payment, deselect the Split Payments toggle switch. See Create a single payment order.
-
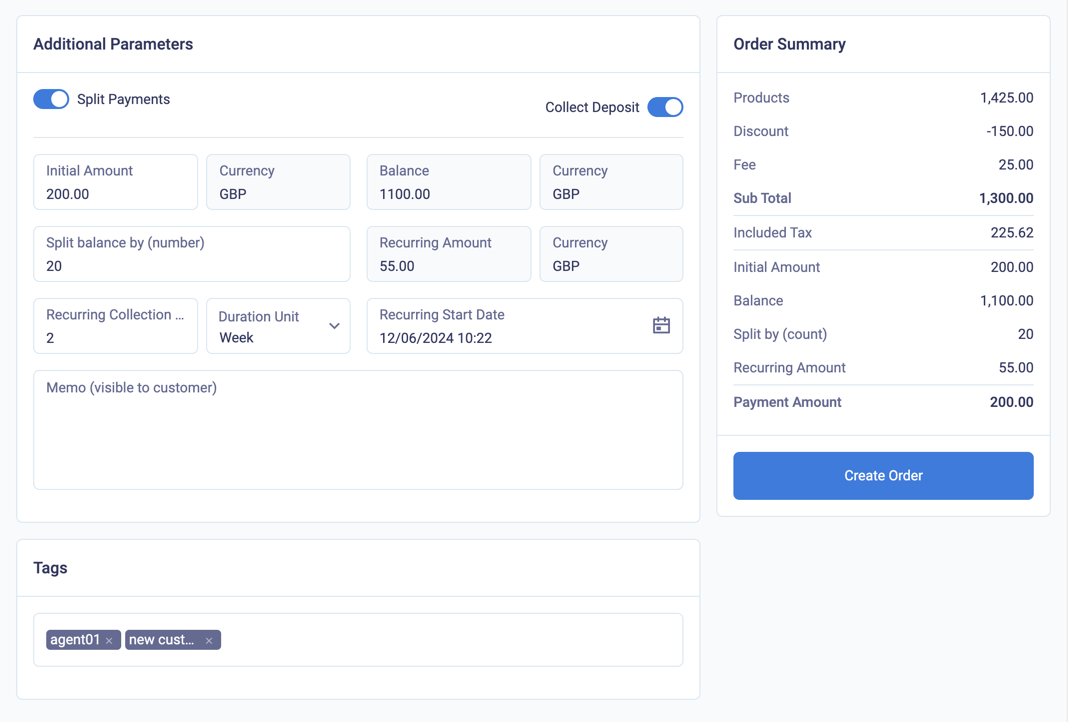
(Optional) To charge an amount immediately, select the Collect Deposit toggle switch and enter the Initial Amount.
-
For Split Balance by (number), enter the number of scheduled payments.
-
For Recurring Collection Interval, select a time interval between billing events from the Recurring Start Date or select CUSTOM.
-
If you selected
CUSTOM, enter the Recurring Collection Interval and select a Duration Unit. For example, to collect a payment every three months, set a Recurring Collection Interval of3and a Duration Unit ofMonth. -
(Optional) Change the Recurring Start Date from the date and time of the first billing event to another time in UTC time. By default, it is at the end of one recurring collection interval. BillPro displays the payment details in the Order Summary panel.
End of month collectionIf you select the last day of the month, then BillPro schedules the billing event on the last day of each month.

The instalment details and order summary
-
-
(Optional) To display a message for the customer, enter a Memo.
-
(Optional) To classify the order, enter or select Tags. Tags are text labels for internal use and display only. When creating an order, you can assign tags and you can change them later. You can use the same tags for orders and customers. For example, if you have partners who refer customers or sales agents in the field, you can create a tag for them and then calculate commissions or rewards based on the Order Tags field in the Orders report.
-
Click Create Order. BillPro creates a draft instalment order. Bill Pro displays the Order Summary with the customer details, and the Card Registration panel.
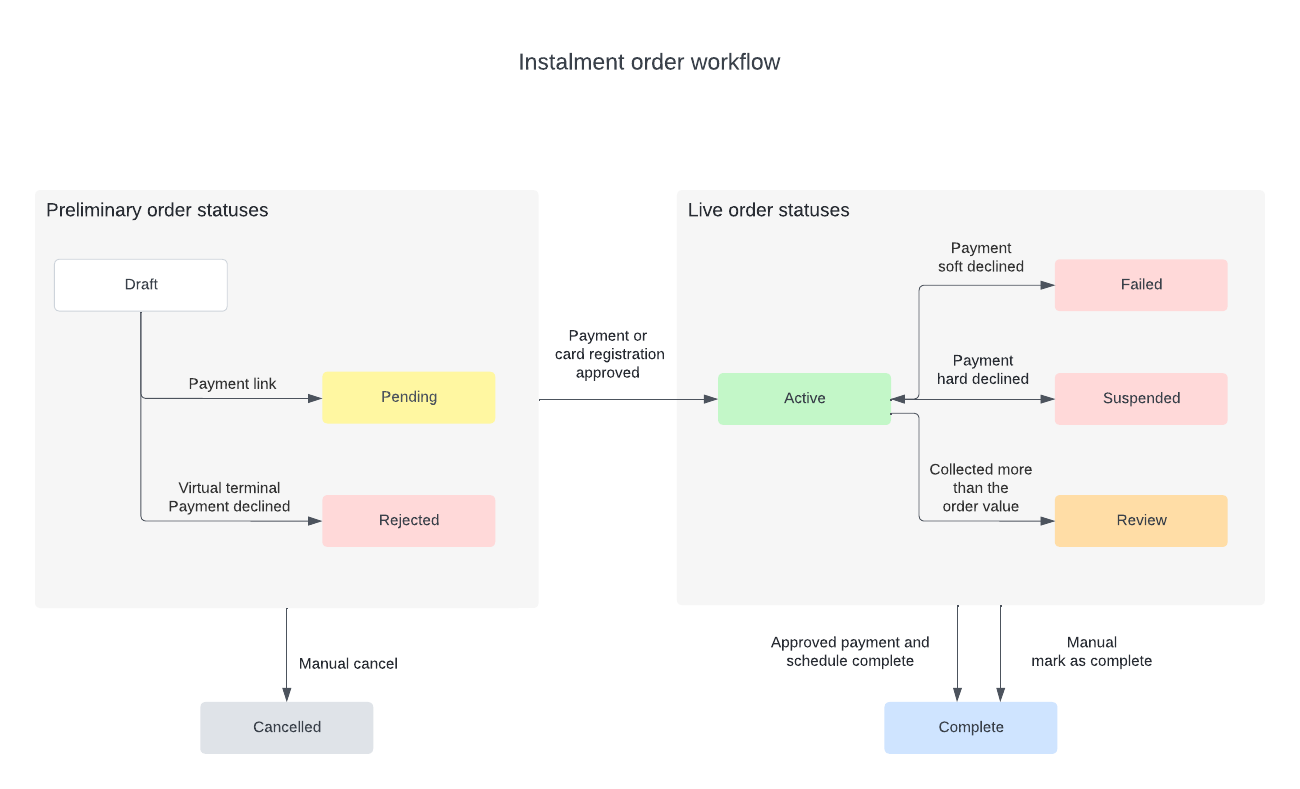
For the initial payment or card registration, you can send the customer a payment link or take a payment over the phone. When the payment or card registration is authorised, BillPro sets the order status to Active and creates all the billing events for the scheduled payments.
Refresh buttonWhen you are creating an order, the round arrow Refresh button at the top right of the screen will reset the order by deleting all values.
Instalment scheduleYou cannot add more billing events to an instalment order. When you are managing billing events, check carefully that you are collecting the required amount. If you need to collect an additional payment, create a separate single payment order.
The following diagram shows the status transitions for an instalment order.

Status flow for instalment orders
Updated 27 days ago
Take a payment or register a card by phone or send a request for payment or card registration.
